
Tools
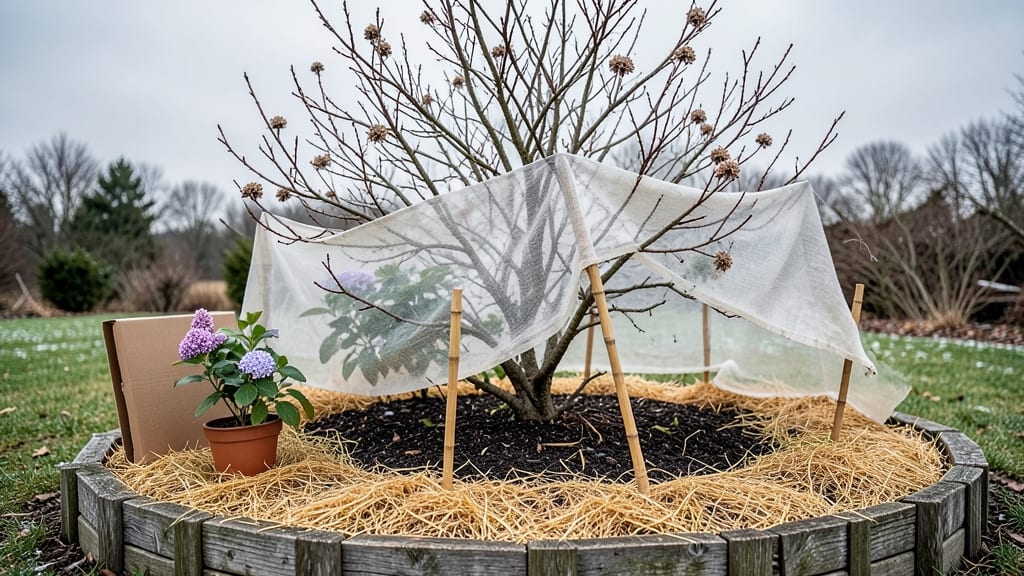
Winter protection for your garden is the key to saving your General Garden Plants 🌱 from frost damage without relying on chemicals.
Picture this: you’ve spent months nurturing perennials, veggies, and shrubs, only for a single hard frost to turn your hard work into a brittle mess. The good news? A layered defense system—using mulch, covers, and windbreaks—can shield your plants from the cold while keeping soil healthy and roots safe.
This isn’t just about throwing down a tarp or piling on leaves. The most effective winter protection combines five strategic layers, each playing a role in insulating, retaining moisture, and breaking wind.
Whether you’re in zone 6a or a colder climate, these natural barriers work for everything from delicate herbs to towering shrubs.
Below, I’ll walk you through the exact materials to use, how to layer them for maximum impact, and the common mistakes that leave plants vulnerable—so you can wake up to a thriving garden come spring.
How to build a 5-Layered frost-protection system for your garden
Frost damage can devastate your garden overnight, but a multi-layered defense system creates a protective barrier that shields plants from harsh winter conditions. The key is combining natural insulators, physical barriers, and microclimate adjustments to create a gradient of warmth.
This approach works for everything from delicate herbs to tender perennials, ensuring your garden survives even the coldest nights.
Think of this system like layers of clothing—each one adds insulation and protection. The first layer targets the soil, while the final layer focuses on air temperature. By implementing these steps in order, you’ll maximize effectiveness while keeping your garden chemical-free and eco-friendly.
The best part? Most materials are inexpensive or even free if you use yard waste.
5-Step Frost-Protection System
-
1
Layer 1: Soil Insulation (Most Critical)
Apply 4-6 inches of organic mulch (straw, shredded leaves, or pine needles) to insulate roots. This traps heat in the soil and prevents freeze-thaw cycles that damage roots. -
2
Layer 2: Row Covers & Cloches
Use frost blankets or lightweight row covers (made of spun polyester or breathable fabric) to trap radiant heat. Secure edges with bricks or soil to prevent wind from lifting covers. Ideal for vegetables and herbs. -
3
Layer 3: Windbreaks & Physical Barriers
Install temporary windbreaks (burlap screens, evergreen shrubs, or even snow fences) to block chilling winds. Wind is the enemy—it accelerates heat loss and increases frost risk by 30-50%. -
4
Layer 4: Insulation Blankets (For Extreme Cold)
For hard freezes (below 20°F), drape thick insulation blankets (like old towels, bubble wrap, or even cardboard boxes) over plants. Avoid plastic—it traps moisture and causes rot. -
5
Layer 5: Microclimate Adjustments
Create microclimates by grouping plants together, using black plastic mulch to absorb sunlight, or planting near south-facing walls. Even a 10°F difference can mean survival or death for tender plants.
Start implementing these layers before the first frost—ideally in late September or early October for most climates. For USDA Zone 6a, like the example provided, begin by mid-October when nighttime temperatures drop below 40°F. Each layer builds on the last, so don’t skip steps.
For instance, mulch alone can raise soil temperatures by 5-10°F, but adding a row cover on top can push that up to 15°F—the difference between a frozen plant and a thriving one.
For delicate plants like tomatoes, peppers, or basil, combine Layer 1 (mulch) with Layer 2 (row covers) and Layer 4 (insulation blankets) for the harshest nights. Even perennials benefit from Layer 3 (windbreaks) to reduce stress.
The goal is to mimic natural insulation, just like how a thick forest floor protects roots in winter.
Pro tip: Monitor your garden on cold nights. If temperatures are predicted to drop below 25°F, add an extra layer of bubble wrap or old blankets over sensitive plants.
Just remember to remove them during the day to prevent overheating or moisture buildup. Balance is key—too much insulation can suffocate plants just as much as too little.
This system isn’t just for vegetables—it works for shrubs, roses, and even young trees. For example, wrapping the trunk of a fruit tree with burlap or tree wrap (Layer 3) prevents sun scald in winter, while mulching around the base (Layer 1) keeps roots warm.
The beauty of this approach is its flexibility—adjust layers based on your local climate and plant types. 🌱
One common mistake is overlooking wind exposure. Even if temperatures are mild, a strong wind can drop the felt temperature by 10-20°F, making frost more likely. That’s why Layer 3 (windbreaks) is non-negotiable in open or exposed gardens.
Pair it with Layer 5 (microclimates) by planting tall plants like sunflowers or corn as natural windbreaks, or use evergreen hedges for year-round protection.
Finally, seasonal timing matters. Apply mulch in fall (after the first frost) and remove it in early spring to avoid suffocating roots as temperatures rise. For row covers, install them at dusk on frost-prone nights and remove them by 10 AM to allow sunlight and airflow.
This daily adjustment ensures your plants stay healthy while still benefiting from protection.
With this 5-layered system, you’ll create a fortress for your garden that keeps plants safe from frost, wind, and temperature swings—all without chemicals.
Best natural mulches and insulators to use for winter garden protection
When winter rolls in, your garden's survival depends on the right mulch and insulation. Organic materials like straw or pine needles protect roots while regulating soil temperature, while inorganic options like cardboard or bubble wrap block wind and retain moisture.
The key is balancing cost, effectiveness, and eco-friendliness—here’s how each option measures up.
Natural mulches break down over time, enriching soil with nutrients, but they may require replenishing. Inorganic insulators last longer but can trap too much moisture if not used correctly.
For example, pine straw is excellent for acid-loving plants like azaleas, while cardboard works well under straw mulch to block weeds and insulate roots. Let’s compare the best options to keep your garden thriving through frost.
For perennials and vegetables, I recommend combining straw or pine needles with a layer of cardboard to block weeds and insulate roots. Straw is my top pick for moisture retention and nutrient enrichment, while pine needles work best for acid-loving plants like blueberries.
If you’re on a budget, shredded leaves are free and effective, though they break down faster.
Inorganic options like bubble wrap or cardboard can be cost-effective but require extra layers to prevent moisture buildup. For example, place cardboard under straw mulch to create a weed barrier while insulating roots.
Avoid plastic-based insulators like bubble wrap unless paired with organic mulch, as they can trap too much moisture and suffocate plants.
To maximize winter protection, apply mulch after the first frost when soil temperatures drop below 40°F. For delicate plants, add a 3-inch layer of mulch and top it with burlap or straw bales for extra wind protection.
This layered approach keeps roots 10-15°F warmer than unprotected soil, giving your garden a fighting chance against harsh winters.
Remember, the best mulch depends on your climate and plant types. In colder zones, prioritize thick layers of organic mulch, while milder climates can use lighter materials like shredded leaves. Test a small area first to see how your plants respond before committing to a full garden application.